
Introduction
Sticker removal from a car can be a sticky matter. Dried adhesive, weather-worn decals, and remnants of road trips past often cling to car surfaces with stubborn resolve. As auto enthusiasts or anyone keen on maintaining their vehicle’s aesthetic, it becomes essential to learn the art of removing these pesky stickers without harming the car’s finish. This guide unveils effortless techniques to effectively tackle the task of sticker removal from cars. Whether it’s the bumper, the rear window, or the paintwork, the following sections will cover a step-by-step approach. Beginning with preparing your vehicle, moving through the best removal methods, and finally touching on how to avoid sticker marks in the future, your car will be sticker-free and sparkling in no time. Let’s dive into the world of hassle-free sticker removal.
Preparing Your Car for Sticker Removal
Before you start with the sticker removal from your car, preparing the surface is key. Proper preparation ensures that the process is smooth and less likely to harm your car’s finish. Here are the steps you should take to get your car ready for sticker removal:
- Clean the Area: Wash the sticker and surrounding area with soapy water. Remove any dirt and grime, as this will make it easier to peel the sticker off. Rinse well and dry with a soft cloth.
- Heat the Sticker: Warm stickers are easier to remove. Use a hairdryer or heat gun on a low setting to gently heat the sticker. Keep the heat source moving to avoid damaging the paint.
- Loosen Edges with a Card: Find an old credit card or a plastic scraper. Use it to gently lift the edges of the sticker. This method is particularly helpful if the sticker is already peeling at the corners.
- Apply Adhesive Remover: If the sticker is very stubborn, consider applying a commercial adhesive remover. Let it sit for a few minutes to weaken the bond. Always test adhesive removers on a small, inconspicuous area first.
- Gather Your Tools: Have tools like tweezers or a plastic scraper at hand. They will help remove the sticker without scratching your car’s surface.
By following these preliminary steps, you’re setting yourself up for a successful and efficient sticker removal experience.
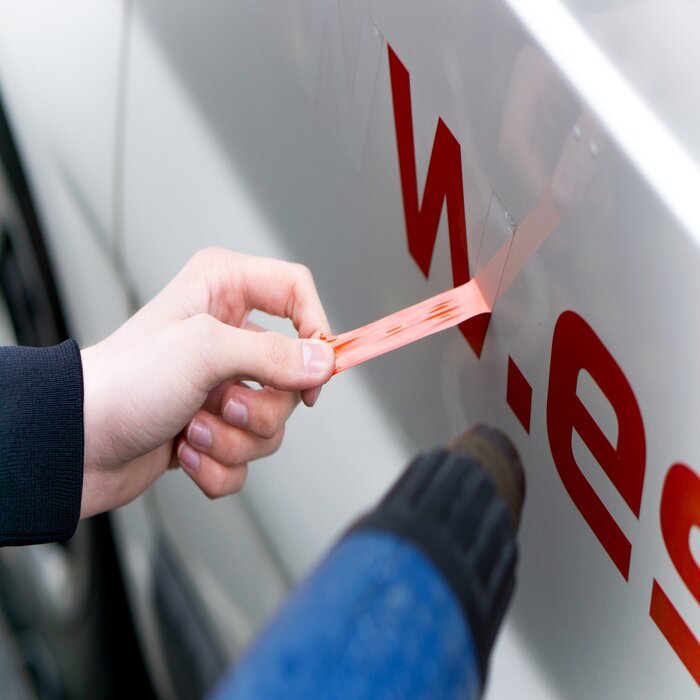
Best Methods for Removing Stickers from Car Paint
Removing stickers from car paint requires care to avoid damage. Use the following methods for safe and effective sticker removal from car paint.
- Use a Hairdryer or Heat Gun: Gently heat the sticker with a hairdryer at a low setting. This loosens the adhesive, making the sticker easier to peel off.
- Peel the Sticker Gently: Once heated, use your fingers or a plastic card to carefully lift the sticker from one corner. Gradually peel it off at an angle.
- Apply Adhesive Remover: For sturdy stickers, apply a commercial adhesive remover. Let it sit, then gently scrape off the sticker.
- Clean with Soapy Water: After removal, wash the area with soapy water. This helps to remove any residue and clean the surface.
- Use a Clay Bar: A clay bar can be very effective in removing any remaining adhesive. Glide it over the surface for a final clean up.
Remember to perform each step with patience and care for the best results.
How to Remove Stickers from Car Windows
Removing stickers from car windows can be less challenging than from paint. The glass is less prone to damage, allowing for a bit more flexibility in removal methods. However, caution is still necessary to prevent scratches on the glass or damage to defroster lines on rear windows. Here are the steps you need to follow for an effective sticker removal from car windows:
- Heat the Sticker: Use a hairdryer set to a warm setting. Direct the heat at the sticker to loosen the adhesive. Do not overheat to avoid damage to the window.
- Peel off Carefully: Start at a corner of the sticker. Slowly peel the sticker away from the glass. If the sticker tears, reheat and try again.
- Use a Razor Blade: On non-tinted windows, cautiously use a razor blade. Hold it at an angle and gently scrape under the sticker. Be extra careful to avoid scratches.
- Apply Window Cleaner: Spray window cleaner on any adhesive residue. Let it soak in to soften the residue.
- Wipe Away Residue: Use a clean, soft cloth to wipe away the residue. If necessary, reapply window cleaner and repeat.
- Final Clean: Once all residue is gone, wipe the window with a fresh cloth. Finish off by cleaning the entire window for a streak-free shine.
Car sticker removal from windows doesn’t have to be a hassle. With the right approach, it should come off with ease. Keep these steps in mind to maintain the clarity and look of your car windows.
Tips for Removing Sticker Residue
Once you’ve removed the actual sticker from your car, you may still face the challenge of sticker residue. This sticky film can be pesky, but with the right techniques, it can be removed cleanly and efficiently. Here are some tips to tackle the residue ensuring your car’s surfaces are spotless:
- Soften the Residue: Reapply heat with a hairdryer. Warm residue is easier to wipe off.
- Use Adhesive Remover: Apply a specialty adhesive remover. Let it sit, then gently rub off the gooey remnants.
- Rubbing Alcohol: Dab rubbing alcohol onto a cloth. Press it on the residue. After a few moments, rub gently to remove the residue.
- Vinegar Solution: Mix equal parts of vinegar and water. Apply with a spray bottle or cloth. Let it soak, then wipe off.
- Olive Oil: Put olive oil on a cloth and lay it on the residue. Let it sit for a few minutes, then wipe clean.
- WD-40: Spray a bit of WD-40 onto the residue. Let it soak, then gently wipe away with a fresh cloth.
- Soapy Water: Sometimes, warm soapy water is enough. Soak the residue, then scrub gently with a soft brush or cloth.
- Clean the Surface: Rinse the area with clean water and dry it off. This ensures no remover or residue remains.
Always test any product on a small, hidden area first to ensure it does not damage your car’s finish. Use these tips to keep your car looking its best after sticker removal.
Tools and Products for Effective Sticker Removal
In the quest for effective sticker removal from cars, having the right tools and products is crucial. They streamline the process and minimize the risk of harm to your car’s finish. Here’s what you’ll need for a hassle-free removal:
- Hairdryer or Heat Gun: A must-have for warming stickers, making them easier to peel.
- Plastic Scraper or Credit Card: These items are gentle alternatives to metal scrapers, preventing scratches.
- Adhesive Remover: Choose a commercial remover designed for vehicles to dissolve stubborn glue.
- Goo Gone Spray Gel: This product tackles sticky residue without harming surfaces.
- Rubbing Alcohol: It breaks down glue, making it ideal for residue cleanup.
- Clean, Soft Cloths: Use these for applying removers and cleaning surfaces.
- Soapy Water: A mix of soap and water is great for initial cleaning and final washes.
- Razor Blade (for windows): Perfect for non-tinted windows, but use with caution to avoid scratches.
- Vinegar Solution: A good home remedy for residue, mix it with water for a gentle cleanse.
- WD-40: Works well for removing tougher residue, but always test a small area first.
- Clay Bar: Finishes the job by removing tiny bits of adhesive left behind.
Ensure you use these tools appropriately, always starting by testing a small hidden section of your car to confirm no damage occurs. With these items at your disposal, sticker removal from your car’s paint and windows can be a smooth operation.
Preventive Measures: Avoiding Sticker Marks
After successfully removing stickers from your car, the next step is to prevent future sticker marks. Preventing these marks not only maintains the car’s aesthetic but also reduces the time and effort required for sticker removal. Here are key strategies to avoid unwanted adhesive marks on your car:
- Choose Removable Stickers: Opt for stickers labeled as ‘removable’ or ‘easy peel’. They are designed to come off cleanly without leaving residue.
- Apply a Protective Film: Consider applying a clear protective film on areas where you like to place stickers. This film can shield the paint, making sticker removal simpler.
- Clean Surface Before Sticking: Ensure the surface is free from dirt and oils. A clean surface allows for smoother removal later on.
- Regular Maintenance: Frequently wash and wax your car to maintain a protective layer on the paint. This makes it harder for adhesives to bond strongly.
- Avoid Prolonged Use: Don’t leave stickers on the car for too long. The longer they stay, the harder they are to remove.
- Use Magnets Instead: If possible, use magnets rather than stickers for decoration or signage. They can be easily moved without leaving any marks.
By following these preventive measures, your car can stay free of unsightly sticker marks, keeping it looking pristine and well-cared-for. Remember, prevention is always better than cure, and when it comes to sticker removal from cars, this saying holds true.
In our conclusion, we will summarize the key points of effortless sticker removal and preventive strategies for maintaining your car’s appearance.
Conclusion
In conclusion, this guide provides you with a range of tips and tricks for sticker removal from your car. We started by outlining the importance of preparing your car for the removal process to prevent any damage to the finish. Additionally, we discussed the essential tools and products that can make the sticker removal process smoother and safer for your car’s surfaces.
Finally, to keep your car looking clean, we provided strategies to prevent future sticker marks. By choosing the right kind of stickers, cleaning surfaces before application, and maintaining regular car care, you can enjoy a sticker-free vehicle.
Remember, when it comes to sticker removal from cars, patience, the right approach, and using suitable tools and products are the keys to success. Keep your car’s aesthetic intact and sticker residue at bay with these effortless techniques.

